Post Reply 
 
Thread Rating:
  • 2 Votes - 3 Average
  • 1
  • 2
  • 3
  • 4
  • 5
OEM Rear Rack- Fitting
Author Message
Pterodactyl Offline
Road Warrior

Sydney, Australia
Posts: 2,740
Joined: Sep 2013
Post: #1
OEM Rear Rack- Fitting
I posted this some time ago in another thread. There is still some interest in fitting OEM Rear Racks so will post again in its own thread. This works for the '10 - '13 models. Can't speak for the '14 so will leave that to those who have seen one. If any one wants to provide feedback please do so. I apologise for some of the photos as to hold allen keys, bolts and simultaneously take a photo is beyond me.


1. Remove seat, cover the fuel tank and tail-light bracket and then pull a pair of sports socks over the indicators. The socks protect the chrome indicator housings from Allen keys and the various bolts as they are removed and replaced. The indicators themselves can be gently pulled, or pushed, to achieve clearance as required.

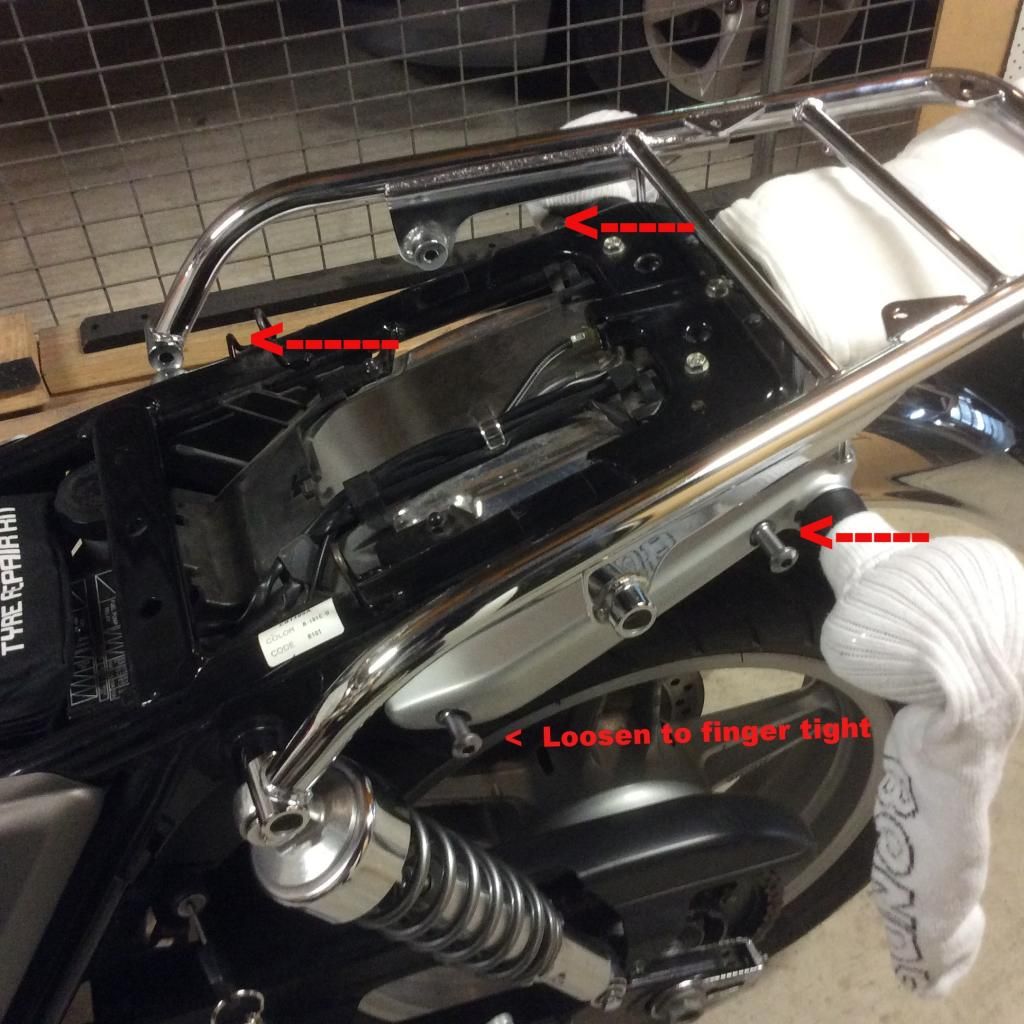
2. With an allen key loosen, to just finger tight, the four grab rail assembly (the silver bits running along the frame) retaining bolts.
İmage

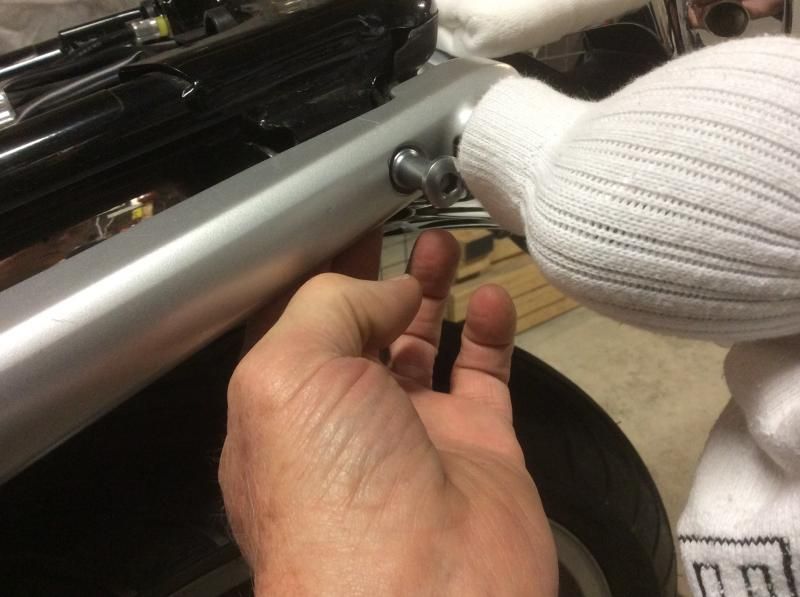
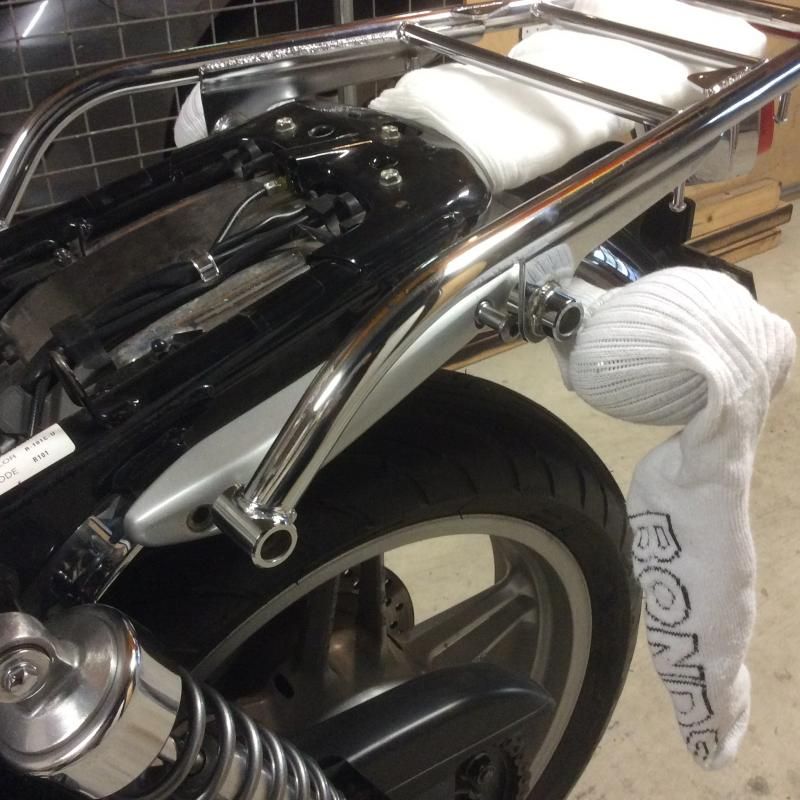
3. Remove the front bolts (only) completely. The grab rail assembly should stay close to "in position". Place the rack roughly in position over the grab rail assembly and tail light area.
İmage

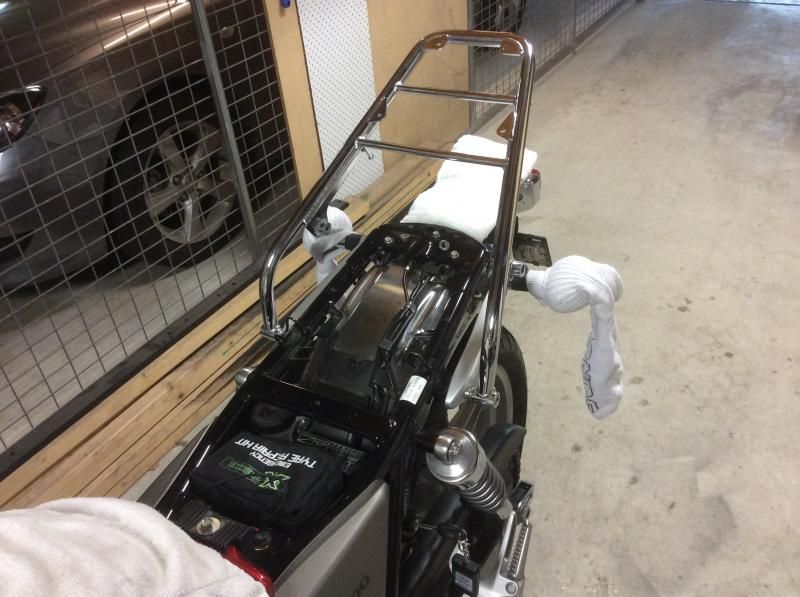
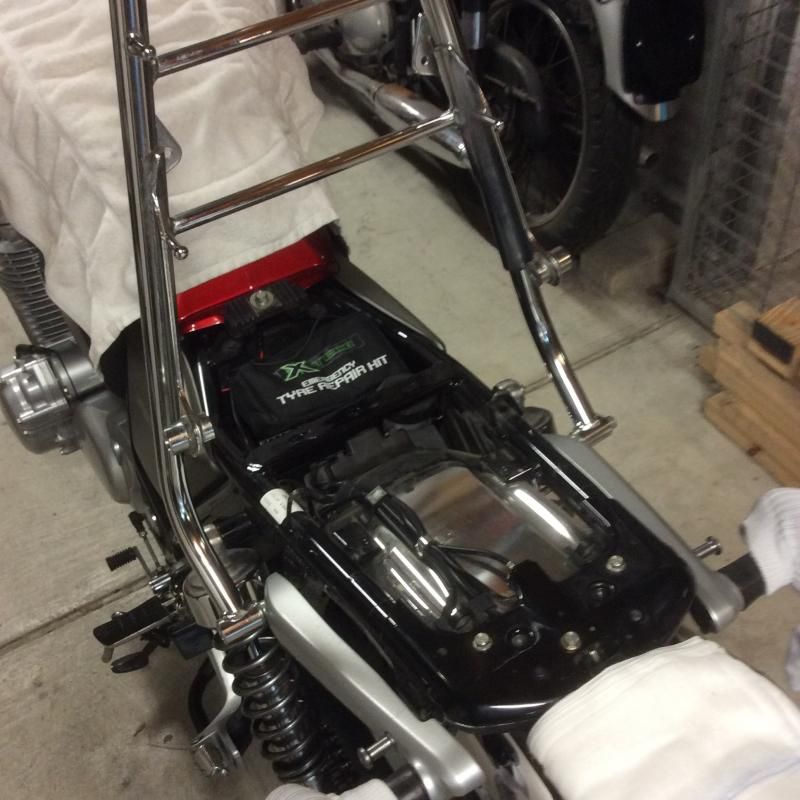
4. Place the front of the rack so that you can slide the (longer) front bolts through the rack, spacers and grab rail assembly through to the nuts that are fixed to the frame. Tighten to finger tight. The rack is now held in position by the front bolts and now sits atop the (covered) tail light assembly at the rear, or if you have the front bolts just tight enough, sitting above the assembly.
İmageİmage

5. Remove the rear bolts by first removing the nuts. The nuts are not attached to the frame. Best to remove the nuts by hand rather than hold the nuts and unscrew the bolts. Hang on to the nuts or let them drop and have fun finding them Rolleyes .

İmage

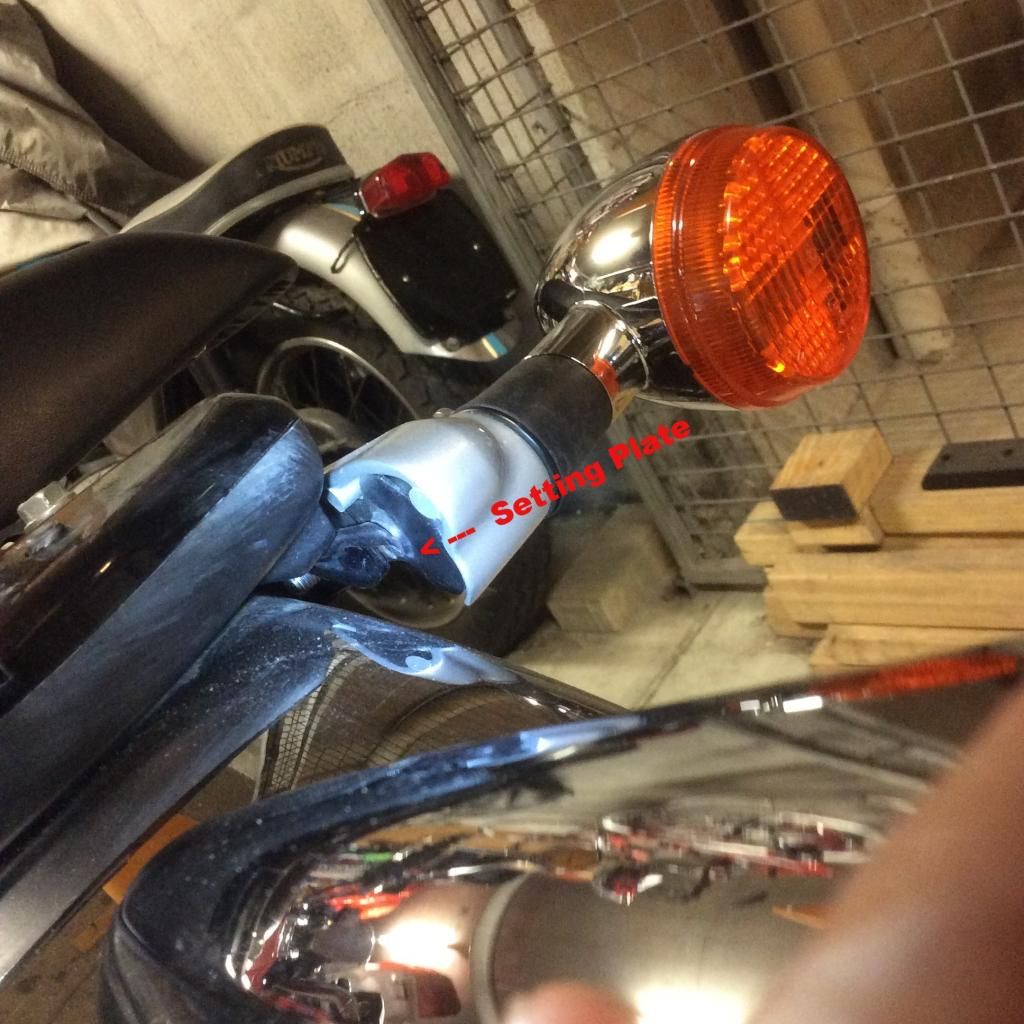
6. Put the rear of the rack and spacers in position and, gently moving the indicators clear, slide in the (longer) rear bolts through the rack, spacers and metal indicator seals (Honda calls them "Setting Plates") Make sure these "seals", which seal off the indicator internals, are correctly positioned with their tabs correctly positioned.
İmage

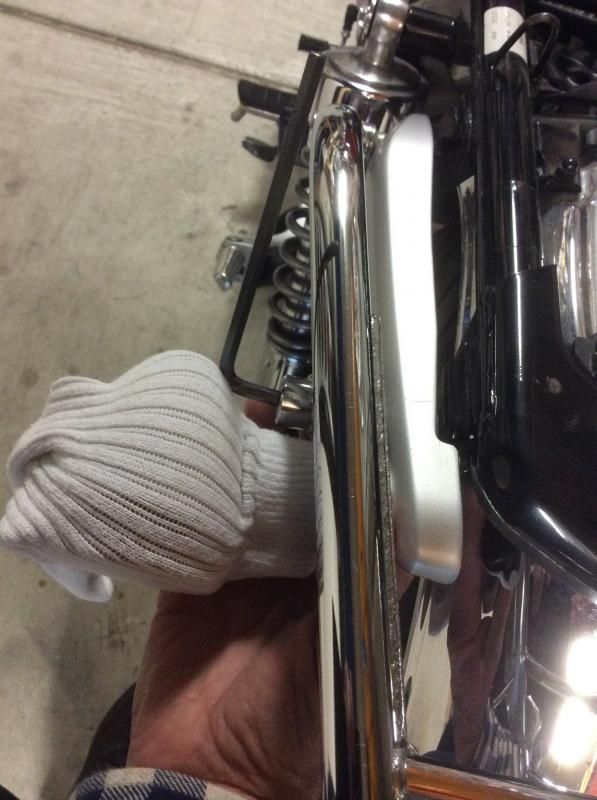
7. The tricky bit is to start the nuts, by fingers, on to the bolts. With the bolts pushed through just enough for you to work with this is achieved a flat and a bit at a time. Once started, jam the nuts ( I use my fingers) and then tighten the bolts.
İmage

8. Tighten all the grab rail mounting bolts so they don't fall out. If your fussy and have a torque wrench then tighten to 26 N.m or 19 lb.ft. Remove protectors, replace seat.

9. Have a cold beer (WARNING - leave this step to last)

VOILA!

I remove and replace my rack at regular intervals. After the first couple of times it takes less than a few minutes. Its like a lot of things in this life; once you have done it, you know how. Some key points:

1. When fitting the front, square the rack so that you can fit the spacers; the rear squares itself when the front is finger tightened
2. Don't damage the indicators when pushing in the rear bolts
3. Make sure the indicator metal seals (setting plates) are positioned correctly
4. While all of the above is going on make sure the key is out of the seat lock/helmet holder. The key is easily bent or broken while in there.

If you got all the above then removal is sorta just a reversal of installation. If you haven't got it, then mate,you are on your own! Undecided

Cheers
(This post was last modified: 11-14-2015 09:26 AM by Guth.)
07-12-2014 12:37 AM
Find all posts by this user Quote this message in a reply
Post Reply 


Messages In This Thread
OEM Rear Rack- Fitting - Pterodactyl - 07-12-2014 12:37 AM
RE: OEM Rear Rack- Fitting - The ferret - 07-12-2014, 03:32 AM
RE: OEM Rear Rack- Fitting - Houtman - 07-12-2014, 04:57 AM
RE: OEM Rear Rack- Fitting - Pterodactyl - 07-12-2014, 05:29 AM
RE: OEM Rear Rack- Fitting - EmptySea - 07-12-2014, 05:17 AM
RE: OEM Rear Rack- Fitting - Houtman - 07-12-2014, 03:38 PM
RE: OEM Rear Rack- Fitting - Randy B - 07-12-2014, 03:42 PM
RE: OEM Rear Rack- Fitting - Cormanus - 07-13-2014, 02:38 AM
RE: OEM Rear Rack- Fitting - Johnboy - 03-07-2015, 12:35 PM
RE: OEM Rear Rack- Fitting - Ghis - 05-12-2015, 09:33 PM
RE: OEM Rear Rack- Fitting - Pterodactyl - 05-13-2015, 02:34 AM
RE: OEM Rear Rack- Fitting - Redbird - 05-22-2015, 10:32 AM
RE: OEM Rear Rack- Fitting - Pterodactyl - 05-23-2015, 12:39 AM
RE: OEM Rear Rack- Fitting - kennyw - 06-08-2015, 11:41 AM
RE: OEM Rear Rack- Fitting - Lord Popgun - 06-08-2015, 05:26 PM
OEM Rear Rack- Fitting - Elipten - 06-08-2015, 05:16 PM
RE: OEM Rear Rack- Fitting - kennyw - 06-08-2015, 08:12 PM
RE: OEM Rear Rack- Fitting - Lord Popgun - 06-08-2015, 08:18 PM
RE: OEM Rear Rack- Fitting - Redbird - 06-09-2015, 07:16 AM
RE: OEM Rear Rack- Fitting - kennyw - 06-09-2015, 08:53 AM
RE: OEM Rear Rack- Fitting - kennyw - 06-09-2015, 01:01 PM
RE: OEM Rear Rack- Fitting - drodg58 - 06-09-2015, 04:46 PM
RE: OEM Rear Rack- Fitting - bikerdave - 06-17-2015, 10:30 AM
RE: OEM Rear Rack- Fitting - drodg58 - 06-17-2015, 12:24 PM
RE: OEM Rear Rack- Fitting - Cormanus - 06-17-2015, 06:10 PM
RE: OEM Rear Rack- Fitting - GaryMNM - 09-19-2015, 09:45 AM
RE: OEM Rear Rack- Fitting - Ragtopme - 03-16-2016, 04:53 PM
RE: OEM Rear Rack- Fitting - Rocky - 03-17-2016, 02:31 AM
RE: OEM Rear Rack- Fitting - Pterodactyl - 03-17-2016, 03:39 AM
RE: OEM Rear Rack- Fitting - Sprout - 09-20-2017, 04:10 PM
RE: OEM Rear Rack- Fitting - jimgl3 - 09-20-2017, 06:38 PM
RE: OEM Rear Rack- Fitting - buckwheat - 06-02-2018, 03:08 AM
RE: OEM Rear Rack- Fitting - Lord Popgun - 06-02-2018, 04:43 AM
RE: OEM Rear Rack- Fitting - buckwheat - 06-02-2018, 08:55 AM
RE: OEM Rear Rack- Fitting - Lord Popgun - 06-02-2018, 09:05 AM
RE: OEM Rear Rack- Fitting - buckwheat - 06-03-2018, 11:52 PM
RE: OEM Rear Rack- Fitting - Jeeves - 07-23-2018, 04:15 PM
RE: OEM Rear Rack- Fitting - mvk24 - 04-08-2019, 08:10 PM

[-]
Forum Friends
Premium Exhausts & Unique Parts from Japan

[-]
Recent Posts
What did you do to/with your other bike?
:blush:Lord Popgun — 05:28 PM
What did you do on, or to, your CB today?
I put Spring air in my bike tires… : . . .Nachodaddy — 04:46 PM
What did you do to/with your other bike?
Nice bike Gold! My first bike was a . . .GoldOxide — 04:34 PM
What did you do to/with your other bike?
Nice bike Gold! My first bike was almos . . .Lord Popgun — 03:56 PM
What did you do on, or to, your CB today?
I put Spring air in my bike tires… :DLord Popgun — 03:55 PM
CB1100 Monthly Photo Challenge
There could always be worse headlines . . .Gone in 60 — 03:10 PM
Todays weather
Today was overcast and it reached about . . .GoldOxide — 02:53 PM
CB1100 Monthly Photo Challenge
That is very pretty! I'm a bit chal . . .GoldOxide — 02:46 PM

[-]
Statistics
» Members: 6,531
» Latest member: Tom the mod
» Forum threads: 15,992
» Forum posts: 330,382

Full Statistics

>
Forum Jump: